728x90
DB 쿼리문을 돌려야하므로 테스트 실행불가
<form>
	<input type="text" name="u_id" />
	<input type="button" value="아이디 중복 확인" onclick="openConfirmId(this.form)"/>
 </form>


  <script>
    function openConfirmId(inputForm) {
	         if(inputForm.u_id.value == ""){
	            alert("아이디를 입력하세요.");
	            return;    // 이 함수 강제종료
	         }
	         // 검사 팝업 열기
	         let url = "confirmId.jsp?u_id=" + inputForm.u_id.value;
	         open(url, "confirmId", "width=300, height=200, toolbar=no, location=no, status=no, menubar=no, scrollbars=no, resizable=no");
	      }
  </script>
// confirmId.jsp


<%@page import="team.user.model.UserDAO"%>
<%@ page language="java" contentType="text/html; charset=UTF-8"
    pageEncoding="UTF-8"%>
<!DOCTYPE html>
<html>
<head>
<meta charset="UTF-8">
<title>아이디 중복확인</title>
</head>
<%
	request.setCharacterEncoding("UTF-8");
	// open(url...) : url = confirmId.jsp?u_id=값
	String u_id = request.getParameter("u_id");
	// DB 연결해서 사용자가 작성한 id값이 db테이블에 존재하는지 검사
	UserDAO dao = new UserDAO();
	boolean result = dao.confirmId(u_id); // true 이미존재함, false 존재X -> 사용가능
%>
<body>
<%
	if(result) { // true -> 이미 존재 -> 사용불가  %>
	<br />
	<table>
		<tr>
			<td><%= u_id%>은/는 이미 사용중인 아이디 입니다.</td>
		</tr>
	</table> <br />
	<form action="confirmId.jsp" method="post">
		<table>
			<tr>
				<td> 다른 아이디를 선택하세요. <br />
					<input type="text" name="u_id" />
					<input type="submit" value="아이디 중복확인" />
				</td>
			</tr>
		</table>
	</form>

<%	}else { // false -> 존재 X -> 사용 가능 %>

	<br />
	<table>
		<tr>
			<td>입력하신 <%= u_id%>은/는 사용 가능합니다. <br />
				<input type="button" value="닫기" onclick="setU_id()" />
			</td>
		</tr>
	</table>

<%	}%>

	<script>
		function setU_id() {
			// 팝업을 열어준 원래 페이지의 id input태그의 value를
			// 최종 사용할 id로 변경.
			opener.document.inputForm.u_id.value = "<%= u_id%>";
			// 현재 팝업 닫기.
			self.close();
		}
	</script>
</body>
</html>
// DAO 쿼리문 매서드
public boolean confirmId(String u_id) {
boolean result = false;
int u_idCount = 0;
Connection conn = null;
PreparedStatement pstmt = null;
ResultSet rs = null;
try {
conn = getConnection();
String sql = "select count(*) from signup where u_id=?";
pstmt = conn.prepareStatement(sql);
pstmt.setString(1, u_id);
rs = pstmt.executeQuery();
if(rs.next()) {
u_idCount = rs.getInt(1);
System.out.println("u_idCount : " + u_idCount);
if(u_idCount == 1) {
result = true;
}
}
}catch(Exception e) {
e.printStackTrace();
}finally {
if(rs != null) try { rs.close();} catch(SQLException e) { e.printStackTrace(); }
if(pstmt != null) try { pstmt.close();} catch(SQLException e) { e.printStackTrace(); }
if(conn != null) try { conn.close();} catch(SQLException e) { e.printStackTrace(); }
}
return result;
}728x90
'P-Language > [Javascript]' 카테고리의 다른 글
| [JS] 체크박스 선택시 제출버튼 활성화 / check box submit (0) | 2022.07.29 |
|---|---|
| [JS] submit 버튼 눌렀을때 alert YES / NO 띄우기 (0) | 2022.07.29 |
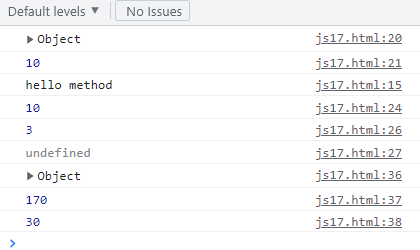
| [Javascript] 17 - addEventListener() 이벤트 등록 (0) | 2022.06.09 |
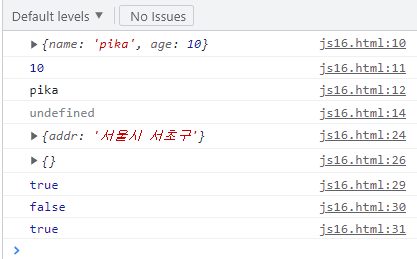
| [Javascript] 16 - 문서 객체 모델 (DOM, Document Object Model) : DOM 트리 (0) | 2022.06.09 |
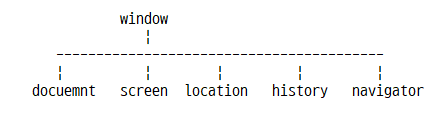
| [Javascript] 15 (2) - 브라우저 객체 모델 (BOM, Browser Object Model) (history, navigator object) (0) | 2022.06.09 |